What are the Best Video Settings for DJI FPV Drone?
To get the best out of the DJI FPV camera system, you need to adjust a few settings and parameters. Here, we help you do that.
The DJI FPV drone is a fantastic long-range drone, the first of its kind made by DJI and followed by Avata.
But this drone excels at flying long-range and capturing cinematic videos.
Although the DJI FPV camera is not the best, it is still suitable for decent video recordings.
But in order to benefit the maximum of this drone camera, you should change a few video settings, which we’ll help you with along this topic.
How good is the DJI FPV camera?
The DJI FPV camera is decent but not the best of its class.
Released at the beginning of 2021, the DJI FPV camera is left behind in terms of quality, and nowadays, many cameras are better than the one the DJI FPV have
But this doesn’t mean you won’t be able to record well and create fantastic cinematic content with your DJI FPV drone when flying in manual mode.
In fact, even nowadays, I often fly my DJI FPV drone long-range and record with its in-built camera.
The most significant advantage is that the camera can record up to 4k at 60 frames per second, which seem fantastic, and altogether with an ND filter, I can obtain smooth cinematic footage.
The camera sensor is relatively small to other DJI drones and is 1/2.3 inch.
But in FPV, it is rare for pilots to use the in-built camera of an FPV drone to record, and they usually have a GoPro mounted on the drone.
However, considering other DJI digital units used on custom FPV drones, the DJI FPV camera is pretty fantastic compared.
The field of view is about 150 degrees, and the camera has a wide aperture of f/2.8
What I also love is that the max bitrate is 120 Mbps, and it can record in H.265 with the ability to set the profile on D-Cinelike.
The D-Cinelike does have a very flat color profile but will help a lot with post-processing; it is equivalent to RAW images in photography.
Moreover, the DJI FPV camera has Rocksteady which will stabilize the image well.
Can you carry a GoPro with the DJI FPV drone?
Yes, the DJI FPV drone is heavy and has strong motors where you can carry a GoPro, not only “bones” (the little version) or Mini, but a full-size GoPro.
However, you have to take into consideration two things if you want to mount a full-size GoPro on your DJI FPV Drone.
- Most of the GoPro mounts I encountered for the DJI FPV drones are pretty crap, they crack easily, and nothing seems to be good quality enough to be worth the risk unless you ensure the GoPro is mounted very stable on top of the drone.
- If you mount a full-size GoPro on your DJI FPV drone, you change the gravity center of the drone, increasing the risks of tumbling if you fly chaotically and carelessly.
But to quickly cover this, yes, you can use a GoPro on top of the DJI FPV drone, which makes it a good choice for many pilots nowadays despite its older age.
Best video settings to change for the DJI FPV drone
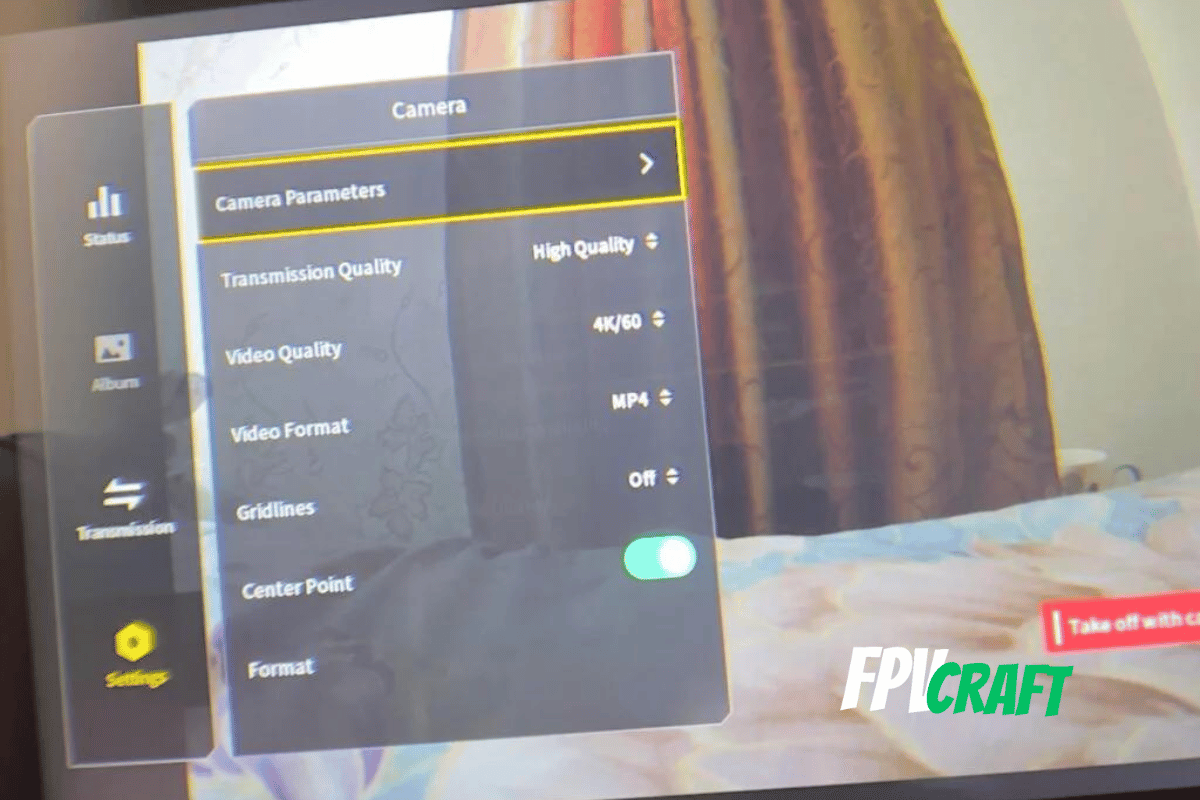
If you are looking for the absolute best video settings, here is what I use based on many flights and research.
Gimbal Pitch Speed: Slow
Wherever you are trying to film while in normal mode or sport mode, you want your gimbal speed to be slow to create cinematic gimbal moves.
In manual mode, it doesn’t matter that much, but I still prefer it to be slow when I adjust my camera angle not to go too fast.
Coordinated turn (S-Mode)
When you take turns in sport mode, your drone will tilt, and the camera can offer you a tilting angle of a maximum of 10 degrees with electronic stabilization before the entire horizon line tilts.
I set the coordinated turn to Large Roll Angle.
Camera parameters
When I fly my DJI FPV drone, most of the time, I use ND filters that I have for it.
If you don’t use any ND filters, then you can leave the camera on auto with the exposure value set to zero.
The White Balance is set manually to 5500K.
Even if you don’t have ND filters, it is good to keep the same camera values for the image not to become darker or brighter when flying the drone.
One of the essential points is to always set the ISO to 100 and the shutter speed accordingly to have a properly exposed image.
If you have ND filters for your DJI FPV drone, always set your shutter speed double the framerate you are recording.
For instance, if you record in 60 frames per second, then choose the Shutter Speed to be 1/120sec.
If you record in 30 seconds, the shutter speed should be 1/60 sec.
Please ensure that you use the right ND filter for your DJI FPV drone, depending on the outdoor light conditions and the framerate you use.
» READ MORE: 27 FPV Tips to Know Before Flying FPV Drones
Transmission Quality
When you choose the transmission quality for your DJI FPV, you can choose from high-quality or low-latency.
- The high-quality mode transmission will send to the goggle a live view image with 810p at 60 frames per second but with higher latency, up to 40 milliseconds.
- The low-quality mode transmission will transmit a live view image with the same 810p resolution but at 120 frames per second and lower latency (18-28 milliseconds)
However, the image is more compressed in the low-quality mode, and you will see a noticeable difference in reduced image quality.
I personally set my DJI FPV to high-quality mode. Sixty frames per second seem pretty enough (although the 120fps will offer you unique motion when flying the drone), and for flying long-range, 40ms is acceptable.
But if you are having riskier flights such as freestyle, where you need less latency, or you want to experience a higher framerate view and don’t mind the loss of image quality, then go for the low-quality mode.
» READ MORE: Standard GPS Drones vs. FPV Drones Video Latency
Video Quality
When I record with my DJI FPV drone, I always have set to record in 4k at 60 frames per second. I simply loved 60fps in videography since many years ago.
But most people will only use 30 frames per second, and that’s perfectly fine, particularly if you want to introduce motion into your videos.
Video Format
The MP4 is one of the most widespread video formats nowadays.
You can also set to film with your DJI FPV drone in MOV, but I always preferred the MP4 for two reasons:
- It has a broader usage spread across different devices
- It’s more compressed, and the files are in smaller sizes with pretty much little difference
If you are looking only for the best quality video you can get from your DJI FPV drone, then you can choose the .MOV format instead.
I always was pleased with the .MP4 results from my DJI FPV drone.
Center Point
Although not directly related to the video quality resulting from the drone, I have enabled the center point for better and smoother coordination while flying in manual mode.
Don’t worry; the cross in the middle of the screen won’t be recorded in your videos.
» READ MORE: How to Learn FPV in Simulators (Ultimate Guide)
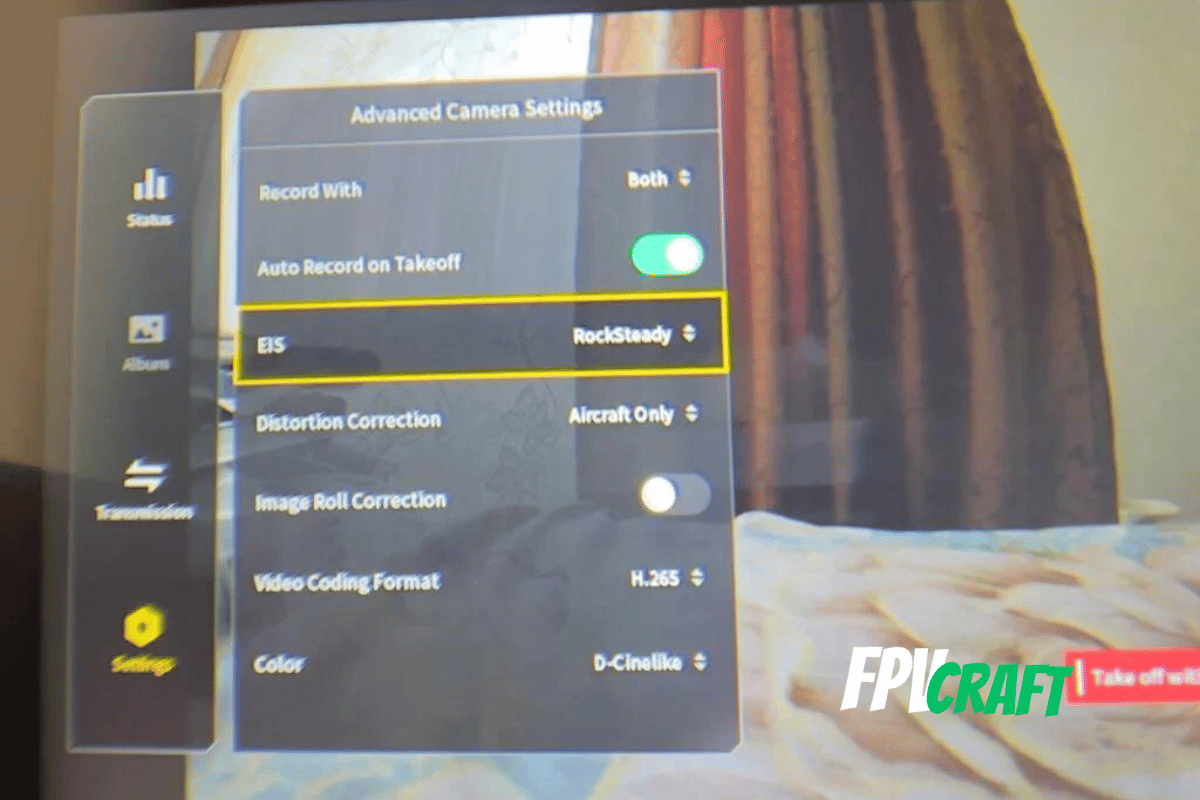
Advanced camera settings
This is more like a personal preference, but I have set to record with both drone and goggles when flying.
If, for some reason, something happens with my drone when I fly it, I have the video recorded from the goggles.
But this is not mandatory.
What I will strongly recommend to enable instead is the auto record on takeoff.
Many times you could forget to start recording your videos with the DJI FPV drone.
That’s why, this setting I always have it enabled.
EIS (Electronic Image Stabilization)
The image resulting from the fundamental records with your DJI FPV drone will always be rocky and shaky; most of it would simply be unusable.
That’s why it is essential always to have Rocksteady enabled on your drone.
You can make a comparison between the recordings from your DJI FPV drone and the ones in the goggles.
You will simply see how much difference it can make the Rocksteady.
That is, of course, unless you have a professional-grade stabilization software that does a better job than the Rocksteady, but I doubt.
» READ MORE: Does DJI FPV Drone Have RockSteady and HorizonSteady?
Distortion Correction
The distortion correction will help altogether with EIS to remove the props from your videos.
If you have enabled it, you won’t even notice the props of the DJI FPV drone in your drone videos.
I usually enable it only for the aircraft (Aircraft Only) as I like the videos resulting from the goggles to be as natural as possible.
Image roll correction
Permanently disable the Image Roll Correction if you fly your DJI FPV in manual mode.
If you Powerloop or do any acrobatic tricks, the image roll will simply attempt to stabilize the video when you roll with your drone.
There is absolutely no use of the roll correction in any of the situations you fly manually.
But if you want to fly more like a classic drone in normal mode and the image to be as smooth and straight as possible, that’s the best use of this setting.
Video Coding Format
I have set my video coding format to H.265;
It offers more advanced compression algorithms and results in better-compressed video with better quality than the H.264
However, post-processing the H.265 may require more computer resources; therefore, if you have an older PC and your H.265 is laggy, try to set the DJI FPV with H.264 to see if you get better performance.
In most cases, always use the H.265 video codec.
Color
Now, you have two profiles: The Normal and D-Cinelike
What can I say here is that if you simply want to fly your DJI FPV drone and don’t care much for video quality and you don’t want to post-process the video, then keep it on normal.
But for anyone who wants to fly the DJI FPV drone and capture cinematic footage and then edit in any post-processing software, you will ALWAYS want to choose the D-Cinelike.
This profile flattens the colors and contrast, which will allow you to adjust and pop up in a better way the colors, shadows, saturation, and more in post-processing.
Filming in D-Cinelike with your DJI FPV drone is the same as choosing RAW format in photography.
Rates for capturing cinematic videos
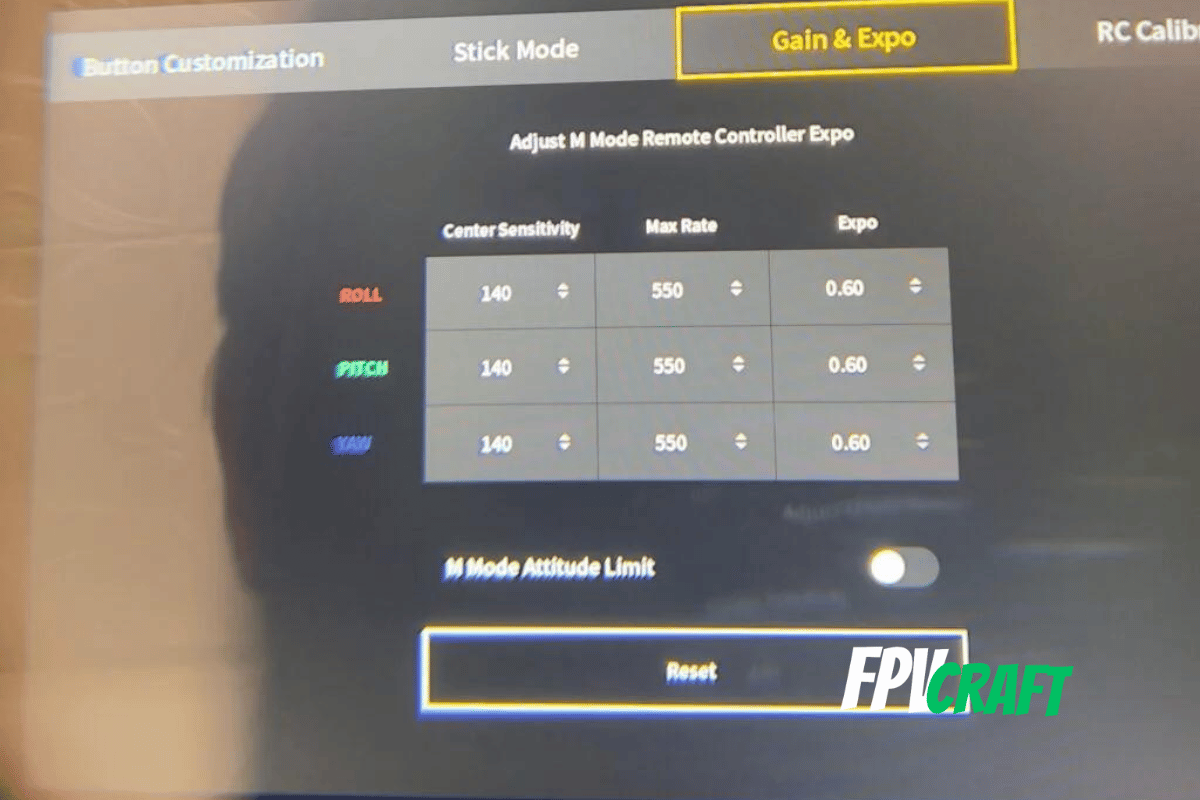
Now, if you want to capture cinematic videos with your DJI FPV drone, surely you want to step further than looking for the best video settings.
That’s why the next step would be to set your rates (gain & expo)
I have written an entire article regarding this if you want to check it below:
» READ MORE: Best Gain & Expo Rates for DJI FPV Drone
But if you are simply looking for reasonable cinematic rates for your DJI FPV drone, use the following:
| DJI FPV Cinematic Rates | Center Sensitivity | Max Rate | Expo |
|---|---|---|---|
| Roll | 140 | 550 | 0.60 |
| Pitch | 140 | 550 | 0.60 |
| Yaw | 140 | 550 | 0.60 |

