Does TRYP FPV work with DJI FPV Remote Controller 2?
If you have the DJI FPV Remote Controller 2 or you want to purchase one prior to a DJI FPV or Avata drone, then you can use it to practice with TRYP FPV. Can you?
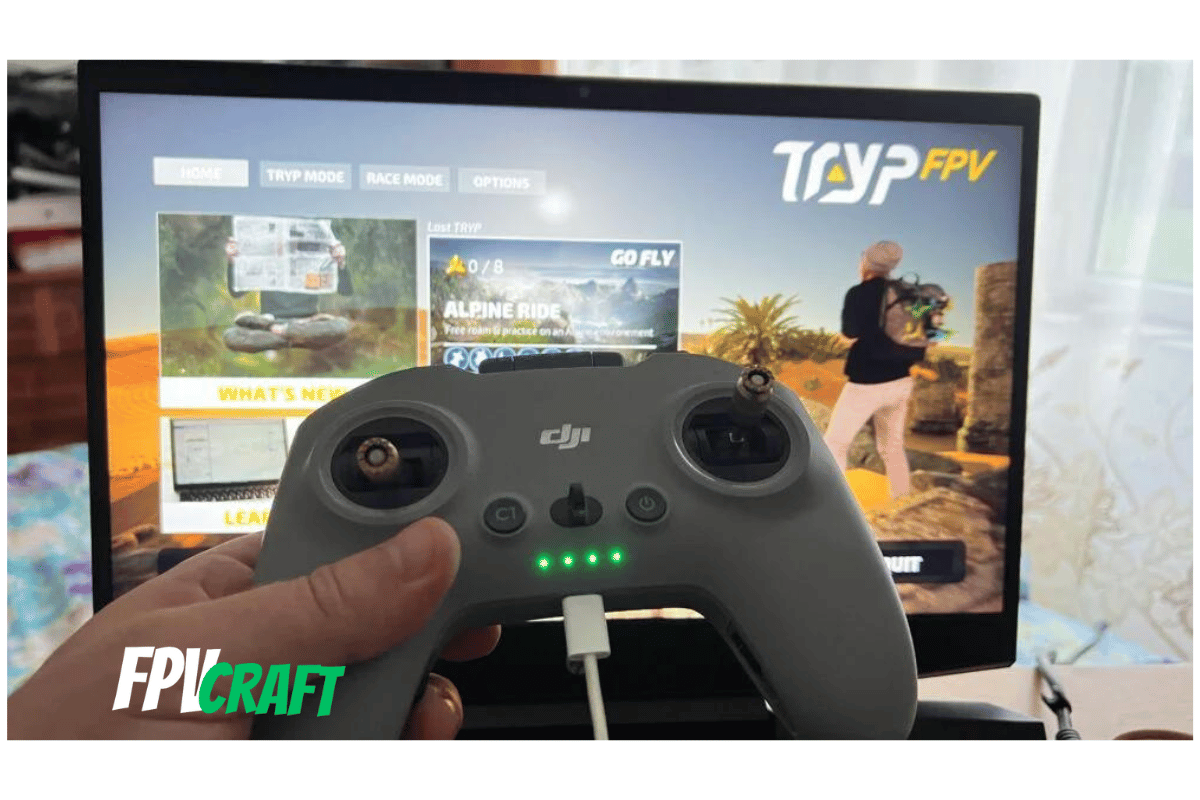
I love TRYP FPV, and there’s nothing not to like about this FPV simulator. From massive maps to rich content, TRYP FPV is one of the top simulators for freestyle and the best to learn to create long-range cinematic content.
But to make it work, you need an FPV remote controller;
If you have or you want to acquire the DJI FPV Remote Controller 2, you are wondering: Does this work with TRYP FPV?
Indeed, the DJI FPV Remote Controller 2 can be used with TRYP FPV both on Windows and Mac Computers and works well. However, this will require setup, calibration, and adjusting the rates for a smooth flying experience.
Furthermore, I want to share with you everything I know about connecting and using the DJI FPV Remote Controller 2 in TRYP FPV Simulator and several tips.
What is TRYP FPV, and why does it need an FPV remote controller to make it work?
The TRYP FPV is a relatively new drone simulator that can be found on Steam and help you learn and practice flying FPV drones before flying outdoors.
As with any new FPV drone pilot, it is mandatory to have at least a couple of hours in a simulator before flying your brand-new quad in the acro mode for the first time.
And TRYP FPV is a fantastic choice, not only to learn but to practice in different scenarios.
This simulator is one of the best for flying FPV drones long-range cinematically, to learn flying alongside cars, motorbikes, skis, balloons, and many more elements.
But to learn to fly an FPV drone in TRYP FPV and practice, you will require an FPV remote controller.
Such a remote controller will be connected to the computer via a USB cable and will fully benefit from learning and getting used to the FPV remote controllers in the simulator before binding it to your quad and flying it outdoors.
Moreover, for an FPV remote controller, you must also remove the spring tension, which is mandatory with flying FPV drones in acro mode.
The DJI FPV Remote Controller 2 is a fantastic choice; the same remote controller can fly the DJI FPV drone and DJI Avata and bind to several DJI air units.
And indeed, I can confirm that TRYP FPV works very well with the DJI FPV Remote Controller 2 – Don’t confuse the second version with the first version of the DJI FPV Remote Controller.
» READ MORE: Can you use DJI FPV Remote Controller 2 with Liftoff Simulator?
How to connect the DJI FPV Remote Controller 2 to your computer
Depending on your input port, you will need a USB-C (to the controller) to either USB-A or USB-C cable (to the computer).
I used the DJI FPV Remote Controller 2 with TRYP FPV with a USB-C to USB-A cable and as well USB-C to USB-C cable on my Windows PC and never had any connectivity issues with TRYP FPV.
However, I always had problems with all my USB-C to USB-C cables (incl data cable) on my MacBook Air M2 with connecting the DJI FPV Remote Controller 2 – it simply doesn’t want to work.
What works instead is using a USB-C to USB-A cable + USB-A to USB-C dongle.
I would strongly recommend you read the following article.
» READ MORE: How to Connect DJI FPV Remote Controller 2 to Mac
Now that you have a successful link between your DJI FPV Remote Controller 2 and your Windows or Mac computer let’s have a look at how to calibrate it.
How do you calibrate the DJI FPV Remote Controller 2 in TRYP FPV Simulator?
Let’s make this simple with step by step guide, shall we?
- Connect and turn on your DJI FPV Remote Controller before entering the simulator.
- Open the TRYP FPV (found on Steam)
- Go to Options > Controls and ensure “selected model” is set for your DJI FPV Remote Controller 2 (mine is HID Interface)
- Go to Calibrate and follow the on-screen tutorial.
- If required (as it was for me), invert the needed axis if this responds the opposite way.
- Ensure that Deadzone is set to zero (you probably won’t need it with the DJI FPV Remote Controller 2 as there are no stick drifts)
- You can also set the Respawn / Restart to Axis 4 (as it was for me), which will be the controller’s camera angle cogwheel.
- Don’t enable throttle 0 in the middle, as that’s only for gaming controllers or non-FPV remote controllers.
How well does the DJI FPV Remote Controller 2 work with TRYP FPV?
I never had any issues with using the DJI FPV Remote Controller 2 with the TRYP FPV simulator.
Moreover, out of several radio controllers I have, this one is my favorite to train in TRYP FPV.
As long as you have disabled the dead zone, it will be incredibly smooth to control the drone, and the remote controller will respond to every nano input in the simulator.
But you will have to make a few adjustments to ensure you will fly smoothly in TRYP FPV, which makes a massive difference in skill.
One most important thing is to set the custom rates for your controller in the simulator.
» READ MORE: DJI FPV Remote Controller 2 with Uncrashed FPV Drone Simulator
What are the best rates for TRYP FPV to use with DJI FPV Remote Controller 2?
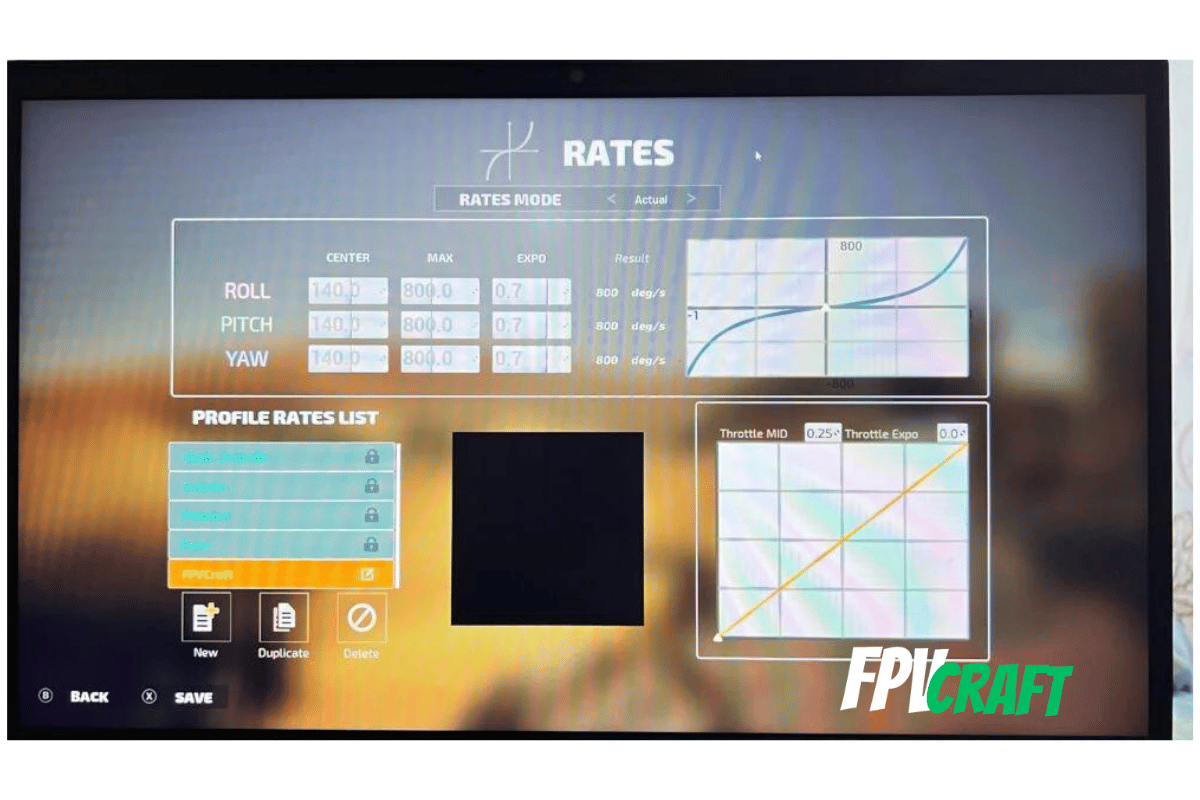
I love to use custom RATES on all the simulators I train and not only TRYP FPV.
I spent hours and hours testing all kinds of rates with my DJI FPV Remote Controller 2, and these, which I share with you, are the absolute best, and I treasure it.
These rates are fantastic for creating cinematic content and freestyle at the same time; they are very responsive to any micro adjustments when flying your drone.
But before getting there, let’s take it step by step:
- In TRYP FPV Simulator, go to Options, then Rates
- Select RATES MODE: Actual (as we’re going to use now)
- Create a new profile
- Set the Roll, Pitch, and Yaw equally as follows: Center=140; MAX= 800; Expo=0.7
- Let the throttle mid to 0.25 and the throttle expo to zero.
» READ MORE: Can you use DJI FPV Remote Controller 2 with DRL Simulator?

