Best Settings for Velocidrone
If you aim for VelociDrone to practice in an FPV simulator, you choose right. But some settings may be off the table, so here we want to share the best ones with you.
Having an FPV simulator is essential to avoid the costly mistakes of crashing your brand-new FPV drone.
And there’s no simulator better than VelociDrone in terms of drone mechanics, throttle management, and simulator physics.
However, to achieve that, a few settings must be changed within VelociDrone for the best experience ever.
But what to change?
We’ll cover everything you need to know in this short and hyper-focused article about the best settings for VelociDrone.
Choosing an FPV drone in VelociDrone
In VelociDrone, especially if you own the addons for this FPV simulator, you can choose drones to train from 1-inch quads all the way up to 12-inch.
And you can fly them as you want wherever you want without any restrictions.
Yes, if you want, you can race with 1-inch micro drones or fly 12-inch indoors. It’s silly, isn’t it?
Of course, we don’t recommend that, but choosing a drone size will set the middle ground for the type of flight you want to learn.
For instance, I love freestyle and always choose a 5-inch quad in VelociDrone. Sometimes, maybe 3-inch to freestyle in smaller zones, but most of the time, it is 5-inch.
You need to identify what type of FPV drone you want to choose in VelociDrone and try sticking with it to progress with your training and practicing in the simulator.
If you keep swapping it constantly, you’ll have minor setbacks until you learn the new dynamics of your chosen drone.
Although not a setting to change in VelociDrone, choosing and sticking with a drone will increase your progress.
» RELATED: How to Adjust Gimbal Tension on FPV Radio Transmitters
Best Drone Settings in VelociDrone
Now that you have chosen your FPV drone in this simulator, it’s time to change a few settings to make it hyper-realistic.
Here’s what I have focused on having for my 5-inch Nazgul XL5 quad in VelociDrone:
- Frame Lift – Downforce: 100%
- Air Mode: True
- Quad Weight: 100%
- Drag front, top and side: 100%
- Propeller Size: 4040
- Propeller Power: 100%
- Prop Wash: 28%
- Camera Angle: 25 degrees (or choose your own)
- Camera Mix Angle: 0 degrees
- Video Camera: GP 9
- Battery Simulation: True
- Battery Size: 6S 1300ma 100C
- Battery Mass Effect: 100%
Note: You can edit the quad and reach those settings once you have selected your drone before starting a map or after you entered the map.
Now, let’s simplify this. Most of the settings for the quad are factory-based. But a few of them have changed, and we’ll explain why.
To simulate a real quad, we don’t modify the quad weight unless, for some reason, you plan to add additional accessories on a real-life exact quad on top of an action camera to simulate the extra weight or if this is off.
And if you wish for the quad to have slight drag (to simulate a bad build or defective quad), you can add the drag on the front, side, or top to a higher value than others. But for now, we don’t want that.
We want to focus on changing the prop size; you can choose props from 4040 to 5141 for this drone, but I love how the drone feels with 4040 props. You can experiment with prop size, though.
Propeller power remains at 100%, and prop wash at about 28% to simulate a bit of prop wash. You can increase more for more realistic feels.
Camera angle: I love to freestyle at 25 degrees, but choose the one you feel best for the type of flights you want to practice.
Camera mix angle – always set to 0 degrees. It feels like some strange head-tracking. You don’t want that.
Video Camera: GP9. In VelociDrone, an action camera adds weight to the quad and feels so much different to fly, exactly like with a real GoPro on a quad. You will throttle harder, have a bit of drag, and feel the weight. You want that on.
Battery Simulation: TRUE – that’s another important setting to enable. The throttle power will always depend on your battery level.
6S 1300ma 100C – different batteries will have different power and you can feel the weight, especially if we enable the next setting of battery mass effect: 100%. This is how you make your drone in VelociDrone feel more real.
You can also change the battery and choose one accordingly per your liking.
» RELATED: Best Settings for Liftoff Simulator
What Rates to use with VelociDrone?
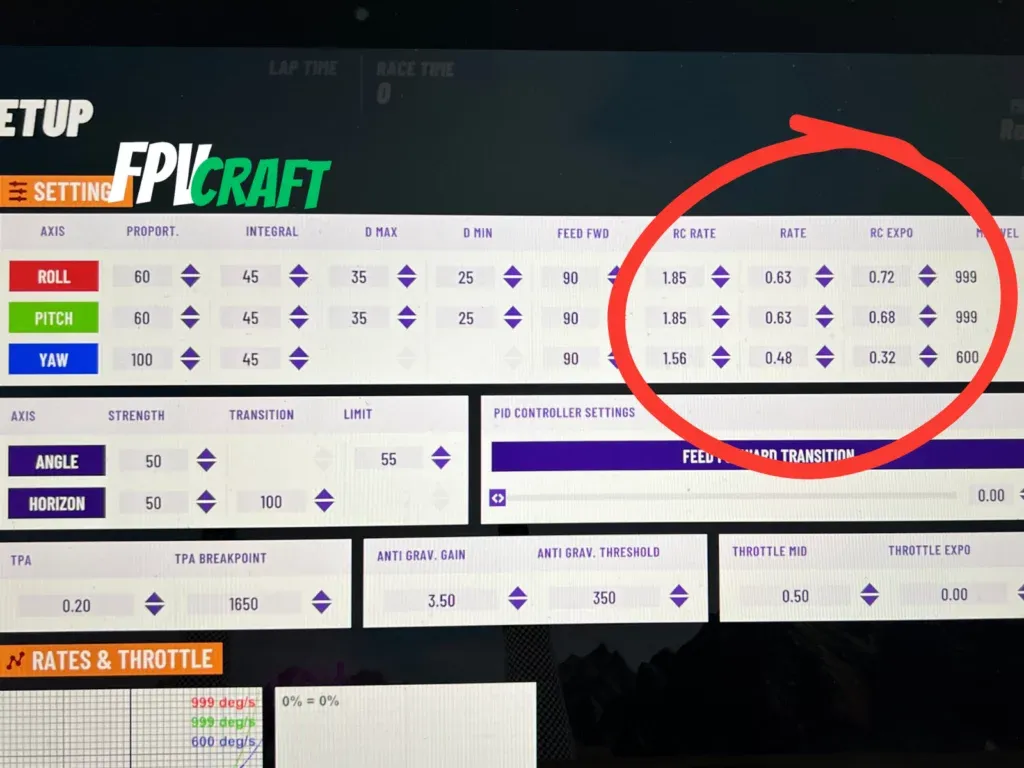
The rates are the following things you may want to change. You have your introductory rates in VelociDrone, but you surely want to choose custom ones.
There are an infinite number of rates, and each drone pilot chooses a different one and has to adjust as per their like.
I have created my own rates that translate into accurate flights when the controller stick is towards the center axis and super-sensitive freestyle (1000 deg/sec) towards the edges.
Feel free to use them, change them, or pick any rates you want. But you have to set the rates you want to fly across not only VelociDrone and other simulators but also add them to your quad.
| AXIS | RC RATE | RATE | RC EXPO |
|---|---|---|---|
| ROLL | 1.85 | 0.63 | 0.72 |
| PITCH | 1.85 | 0.63 | 0.68 |
| YAW | 1.56 | 0.48 | 0.32 |
To change your rates, pick a drone and enter a map. Then press the ‘ESC’ key bind and go to Advanced Quad Setup.
» RELATED: Best RATES for VelociDrone
Your controller and calibration
Nothing will work as it should if you don’t have a decent FPV controller to train in VelociDrone.
Fortunately, the VelociDrone is compatible with most FPV transmitters. But you’ll have to get through the basic calibration process to ensure your controller responds well within the simulator.
In the main menu, go down to “controller,” assign it (by moving a stick to the controller), and then press “assign sticks” to start calibrating and assign the channels to your controller joysticks.
» RELATED: VelociDrone with DJI FPV Remote Controller 2
In conclusion
Changing a few settings in VelociDrone will make a massive difference for a quad to feel as real as possible.
Here, we shared everything you should change, but you can adjust other settings as you like to simulate different scenarios.
Remember that although those settings are strictly for VelociDrone and do not transfer to any other FPV simulator, the rates can be used across everything else.
» RELATED: How to Install & Uninstall VelociDrone on Mac

