Is the DJI FPV Remote Controller 2 any Good? (Review & Guide)
This is an ultimate review of the DJI FPV Remote Controller 2 and a guide to using it, adjusting the throttle spring tension, and help you configure it
The DJI FPV Remote Controller 2 is the main and only controller compatible with DJI FPV and DJI Avata drones (except for the motion controller).
You can also use this remote controller with a few DJI VTX systems on custom FPV drones.
But how good is it? Is DJI FPV Remote Controller 2 worth it?
The DJI FPV Remote Controller 2 is a solid gamepad-like controller compatible with the two DJI drones from the FPV line and a few VTX units from DJI. Its battery life is excellent, it can transmit long-range, and the joysticks are incredibly smooth. This controller is definitely worth buying for the price if you need it.
In this topic, I want to share with you the most extensive review of everything you need to know about the DJI FPV Remote Controller 2 and if this is worth it.
DJI FPV Remote Controller 2 overview
| SPECS | DJI FPV Remote Controller 2 |
|---|---|
| Model Number | FC7BGC |
| Weight | 346 grams |
| Size | 190×140×51 mm |
| Battery Life | Approx. 9 hours |
| Charging Time | Approx. 2.5 hours |
| Charging Voltage | 5V at 2A via USB-C port |
| Capacity | 3.6v 2600mAh with 9.36Wh (x2 batteries) |
| Compatibility | Drones: DJI FPV, DJI Avata VTX: DJI O3 Air Unit, Goggles: DJI FPV Goggles V2, DJI Goggles 2, DJI Integra (new, after firmware update) |
In the world of FPV, there are many remote controllers.
The DJI FPV Remote Controller 2 stands out as one very popular to use with the DJI FPV and DJI Avata drones. That’s its primary purpose.
Released with the DJI FPV drone, this remote controller can be purchased as a kit with DJI FPV from their official website or separately from 3rd party sellers and marketplaces. It doesn’t come with any DJI Avata combo kit.
» READ MORE: Is DJI FPV a Good Drone for an FPV Beginner?
Build & Design
The DJI FPV Remote Controller is compact and simple. I love how it holds in hand. It’s very comfortable to hold it even for a long time.
It is not heavy, weighing about 350 grams. I can consider this to be lightweight as compared to bulky FPV RCs
The finish is soft and has a rubber grip on the back.
If you are used to playing Xbox or Playstation with a gamepad, surely you can get used to it.
Sometimes, after long simulator practices, the DJI FPV Remote Controller 2 gets slightly warm on the back where the radiator is exposed.
But this won’t affect the controller’s functionality and is something normal.
The antenna is the only one that can fold down for transportation.
Also, the sticks can be unscrewed and stored inside the controller.
The only thing I don’t like is the tiny size of the sticks – they are meant to be used only as thumbs.
If you like flying pinch, you may have to acquire separate sticks, longer ones that you can grip with the thumb and index finger.
As for the joystick movement, it is incredibly smooth and reacts to the nanometer.
The spring tension from YAW, PITCH, and ROLL is very soft. I personally love that I don’t have to put much pressure to move any of the joysticks, giving me smoother control when flying a drone.
So even for a pincher, the DJI FPV Remote Controller 2 fits well in the hand.
» READ MORE: How to Learn FPV in Simulators (Ultimate Guide)
Price & Availability
On the DJI website, the DJI FPV Remote Controller 2 is available for sale for $199 at the time of writing this article and production.
You can also find the remote controller separately in most FPV shops around the world and a few marketplaces, such as Amazon.
If you ever intend to buy the DJI FPV Remote Controller 2 separately, let me throw a link here from Amazon (affiliate disclosure).
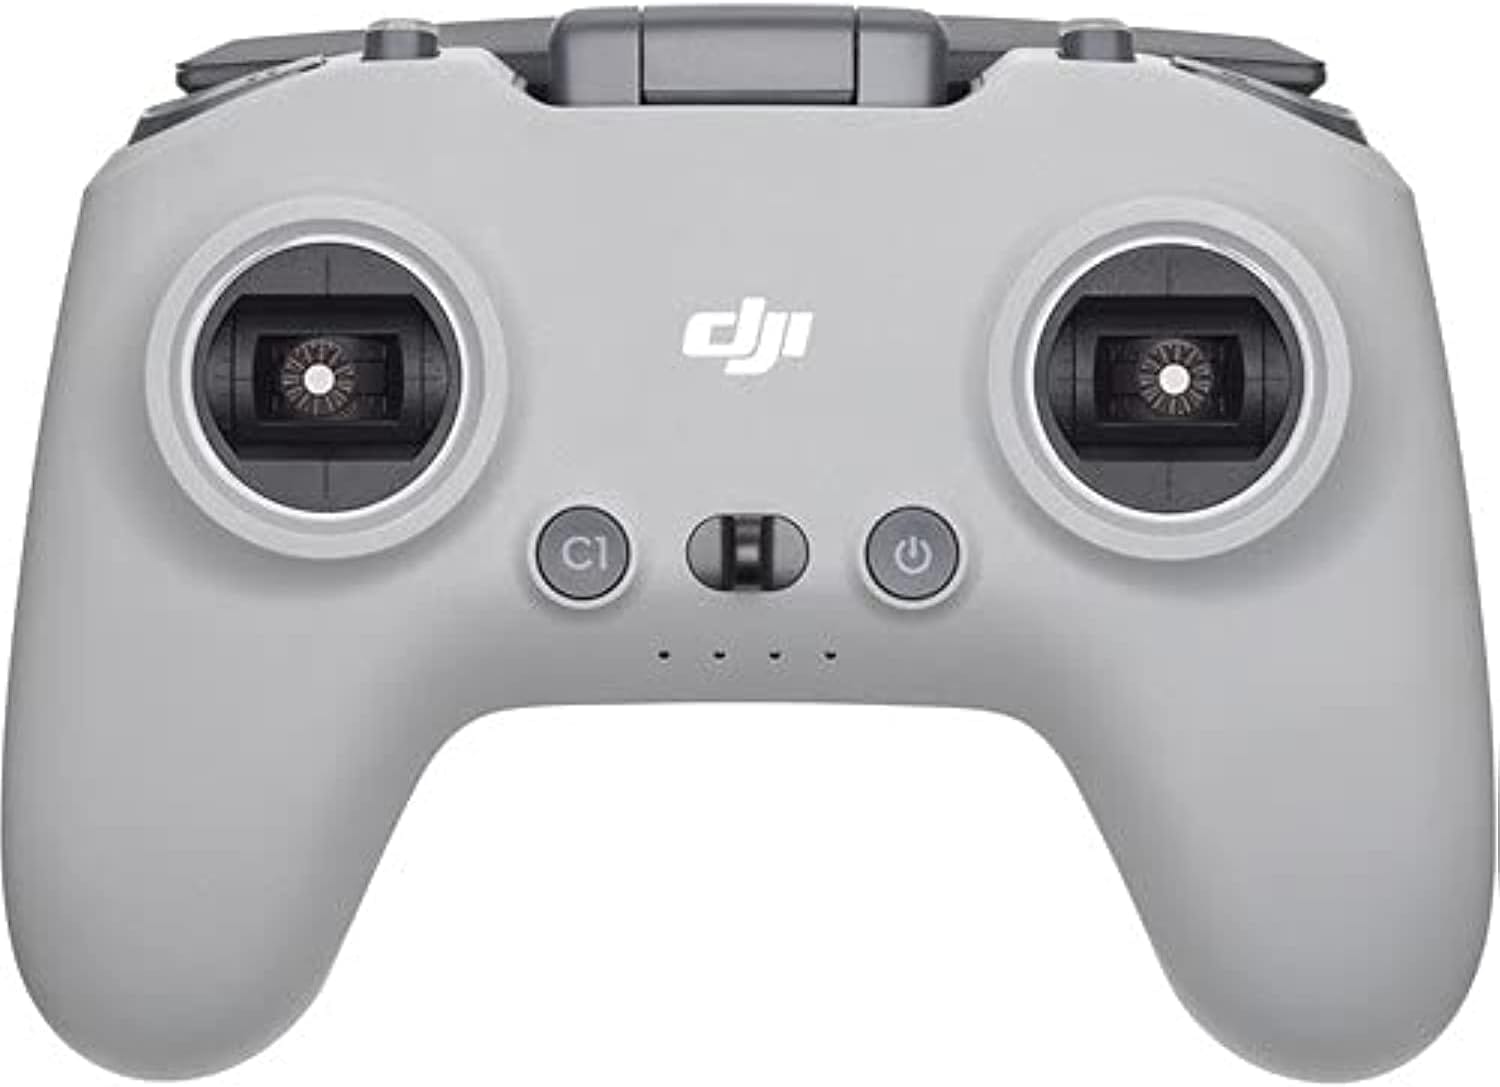
DJI FPV Remote Controller 2
The DJI FPV Remote Controller 2 is compatible with the DJI FPV drone, DJI Avata, and many FPV Simulators such as Liftoff, Velocidrone, DRL, etc.
This is an affiliate link. We earn a commission if you make a purchase, at no additional cost to you.
Okay. What about DJI Avata? Why isn’t a kit with the remote controller available?
Unfortunately, nobody knows why DJI introduced more than several kits of DJI Avata with goggles and motion controllers, but the DJI FPV Remote Controller 2 was not included in any of them.
This pushes pilots to buy the controller separately if buying Avata as a kit, which is not very practical.
And without the DJI FPV Remote Controller 2, you cannot benefit at all from what DJI Avata is capable of. You’ll simply be missing out on all the fun.
Battery Life
According to DJI, the operating time of the DJI FPV Remote Controller is 9 hours. I mean, to fly for 9 hours a drone with the controller? That seems excessively much, isn’t it?
Although I cannot confirm this because I have never flown straight 9 hours to test it, I can say that I spend many hours on FPV simulators, and the controller doesn’t charge when it is connected and turned on (as far as I’m aware).
The battery is 3.6v and has a capacity of 2600mAh 9.36Wh (x2 pieces). That’s what is on the back of the controller.
It charges 5V at 2A via USB-C cable.
Rarely do I have to charge it and see an LED dropdown. The battery life is simply fantastic.
Of course, when flying FPV drones, you may not get those nine hours of battery life, depending on transmission power, the range you fly the drone, ambient temperature, etc.
But even like this, the battery life of DJI FPV Remote Controller 2 is extraordinary.
I have had the remote controller for over a year and a half, and ever since, the battery hasn’t degraded. I even had it stored long-term (for a couple of months) without using it.
It’s still like new, or at least I see no visual difference in battery performance.
Four LEDs in front of the controller indicate the battery by a 25% mark.
- LED 1: 0 to 25%
- LED 2: 25 to 50%
- LED 3: 50 to 75%
- LED 4: 75 to 100%
So, my final thoughts about the battery life of DJI FPV Remote Controller 2 is that I am very impressed, and DJI has done an excellent job.
Transmission Range
The transmission range of DJI FPV Remote Controller 2 depends on what drone/vtx the controller is linked to and what goggles you are using.
In general, with the DJI FPV and DJI Avata, the DJI FPV Remote Controller has a standard restricted range by FCC of up to 6.2 miles (10km), whereas CE, SRRC, and MIC cap transmission range to 3.7 miles (6km).
On the DJI FPV Remote Controller 2 standard specification, it is stated that the DJI FPV Remote Controller 2 has a transmission distance of 3.7 miles (6km).
If you want to fly long-range with the DJI FPV Remote Controller 2, this is more than decent.
Although this remote controller can be used to fly long-range, remember that the interference may deteriorate the transmission signal.
Remember that the DJI FPV Remote Controller 2 does NOT link to a custom radio receiver like with other FPV drones and will use the DJI VTX FPV system for dual transmission (receive radio input and sends live video feed)
» READ MORE: 27 FPV Tips to Know Before Flying FPV Drones
Transmission Frequency
The DJI FPV Remote Controller transmits on dual-band frequency.
It is capable of transmitting in 2.4 GHz and 5 GHz spectrums.
The radio operating frequency on 2.4 GHz is 2.400-2.4835 GHz, whereas in 5GHz is 5.725-5.850 GHz.
However, the regional restrictions will affect the transmission power, ultimately limiting the range we spoke about above.
- For instance, FCC has the least restriction, and the transmission power is ≤ 28.5 dBm for 2.4 GHz and ≤ 31.5 dBm for 5.8 GHz.
- Conversely, in Europe, CE EIRP is ≤ 20 dBm for 2.4 GHz and only ≤ 14 dBm for 5.8 GHz.
- SRRC (China) has the same transmission power of ≤ 20 dBm for 2.4 GHz and better than Europe for 5.8 GHz with ≤ 19 dBm
- MIC (Japan) operates only in 2.4 GHz (for the DJI FPV Remote Controller) with a transmission power of ≤ 20 dBm
Although these terms may be confusing, all you have to know is that the transmission range of DJI FPV Remote Controller 2 is the best in the US and much lower in most countries.
DJI FPV Remote Controller 2 features and buttons
The DJI FPV Remote Controller 2 is simplified compared to many bulky FPV controllers with stick triggers. This controller has buttons instead.
The range of function buttons on the remote controller has the most benefits if used with the DJI FPV and DJI Avata drones.
Now, let’s take each button side by side and share their functions, shall we?
DJI FPV Remote Controller 2 FRONT
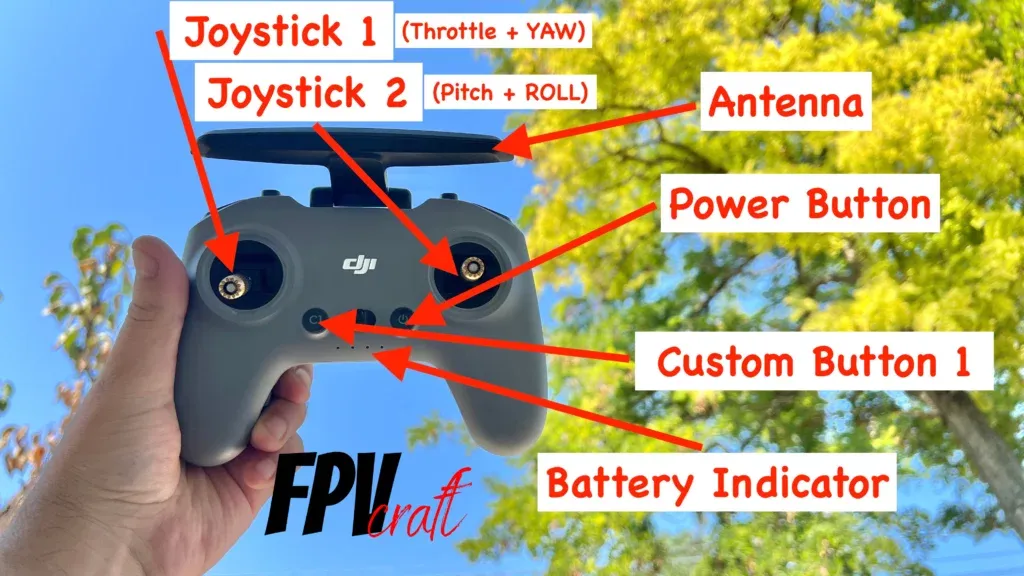
We have the main functions and joysticks on the front side of the DJI FPV Remote Controller.
Power Button: ON and OFF
This will have the main feature of turning on and off the controller itself.
In order to turn it on, you have to press the power button once until all LEDs blink and then long-press it again for a few seconds until you hear a beep.
To turn the controller off, follow the same process.
Joystick 1 and 2
The joysticks have the primary role in controlling the drone and must be continuously adjusted.
- On the joystick 1, UP and DOWN, we have the THROTTLE.
- On the joystick 1, LEFT and RIGHT, we have YAW
- On the joystick 2, UP and DOWN, we have PITCH
- On the Joystick 2, LEFT and RIGHT, we have ROLL
These joysticks are standard with mode 2 of the DJI FPV Remote Controller 2, which is the most common.
C1 (Custom Button)
Many more settings can be assigned (not assigned to any button), and you can set one to this button from within the goggles for the DJI FPV or DJI Avata drone.
Battery Indicator
Here, you will see the battery level of your remote controller, as mentioned in the “battery” section of this article.
Antenna
The antenna in the image above is unfolded. This can fold for transportation, but never fly your drone with the antenna folded, or you will have an inferior signal.
You can train in a simulator with the DJI FPV Remote Controller 2 with the antenna folded; that’s not an issue.
The antenna should face the direction of your drone for the best signal. The signal is best acquired if you think of a 90-degree arc (45 degrees going on each side from the middle of the antenna).
DJI FPV Remote Controller 2 SIDE
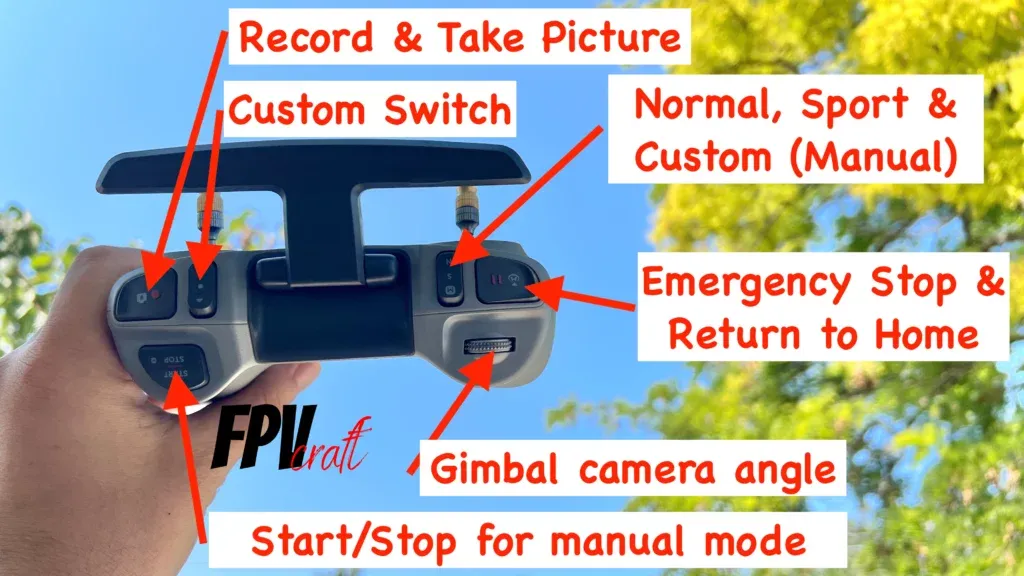
Behind the controller, we find most buttons for different functions at the tip of our fingers.
Custom Switch
We will start with the custom switch. Here, you have three levels you can assign different functions, such as bringing the gimbal up, middle, or down, from within the goggles.
I usually let empty this button as I do not need extra custom triggers.
N, S, and M Mode
This switch also has three levels for DJI FPV or Avata:
- The N Switch will set the drone in normal mode.
- The S Switch will set the drone to sport mode.
- The M Switch is a custom switch and, by default, is set to sport mode but can be set to manual mode, as mentioned above in the article.
» READ MORE: Manual Mode vs. Acro Mode on FPV drones
Record & Take Picture.
This button is self-explanatory and can be used to start and stop recording or take pictures with your drone.
Emergency Stop & Return to Home
Well, this button has two functions.
- If you short-press it, your DJI FPV or DJI Avata will instantly break and stop in one place, hover, and return to normal mode. It is a fantastic button for beginners in case you lose control of your drone.
- If you long-press it for a few seconds, the return-to-home function of your DJI drone will be initialized.
Gimbal Camera Angle
The cogwheel helps with adjusting the camera angle of the FPV drone when flying.
The drone will have a specific camera angle in normal and sport mode, but the manual mode will use a different camera angle.
For instance, if you set your camera angle to 45 degrees in normal mode and -25 degrees in manual mode, these settings will be saved for the N, S, and M modes.
Start/Stop button.
If you fly your DJI FPV or Avata in normal or sport mode, the way you start it is to bring both joysticks down towards each other, away from each other.
But if you are in manual mode, the only way to start your drone is to double-tap the Start/Stop button on the back for the motors to start.
However, be careful that the same button is used to stop and will cut the power to motors if done mid-air when flying in manual mode. That will be an instant crash.
DJI FPV Remote Controller 2 BACK
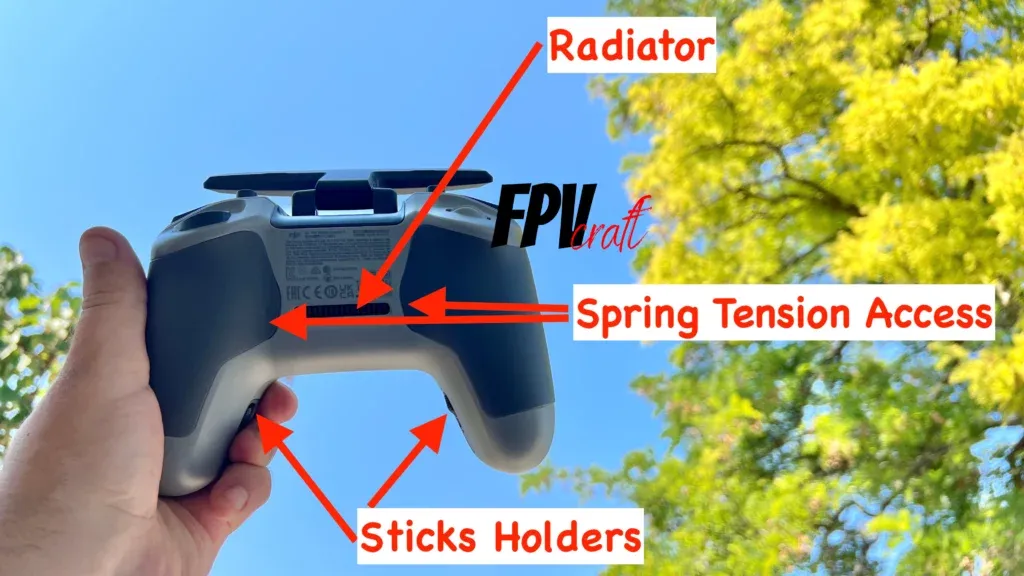
On the back of the controller, we don’t have any buttons.
We have the radiator for the controller, the place where it cools down when heating, and access to the spring tension of the joysticks, one of them being for the throttle, which has to be removed before flying the drone for the first time.
Also, towards the inside, we have a little storage for the joystick sticks to store for transportation. They sit well there, and although I have custom sticks for my controller, the original ones never fell out of their place.
How do you charge DJI FPV Remote Controller 2?
On the front side of the controller, there is a USB-C port. The controller can be connected to basically any USB-A to USB-C or USB-C to USB-C charger; the current input should be automatically regulated when using quick-charging chargers.
I can practically say this because I have charged the remote controller from anything I had at hand, whether it was my iPhone wall charger, a power bank, my portable power station, the laptop, etc.
But it is recommended to use the USB-A to USB-C cable that was provided for you when you bought the remote controller with any USB-A wall chargers.
To charge the DJI FPV Remote Controller 2, it takes approximately 2 hours and a half from empty to full.
» READ MORE: How to Connect DJI FPV Remote Controller 2 to Mac
Does DJI FPV Remote Controller 2 work with FPV simulators?
Yes, indeed, it does.
In fact, I have mainly used my DJI FPV Remote Controller 2 to train in Liftoff, Liftoff Micro Drones, TRYP FPV, Uncrashed, VelociDrone, FPV FreeRider, and DRL Simulator.
I have never had an issue with using this remote controller with all these simulators.
But be aware that you must manually calibrate the controller in each simulator to assign and tune input sticks.
In fact, I have a series of articles I can share with you for using the DJI FPV Remote Controller with different simulators:
- Can you use DJI FPV Remote Controller 2 with Liftoff Simulator?
- Can you use DJI FPV Remote Controller 2 with DRL Simulator?
- DJI FPV Remote Controller 2 with Uncrashed FPV Drone Simulator
- Does TRYP FPV work with DJI FPV Remote Controller 2?
- VelociDrone with DJI FPV Remote Controller 2
How to update DJI FPV Remote Controller 2 firmware?
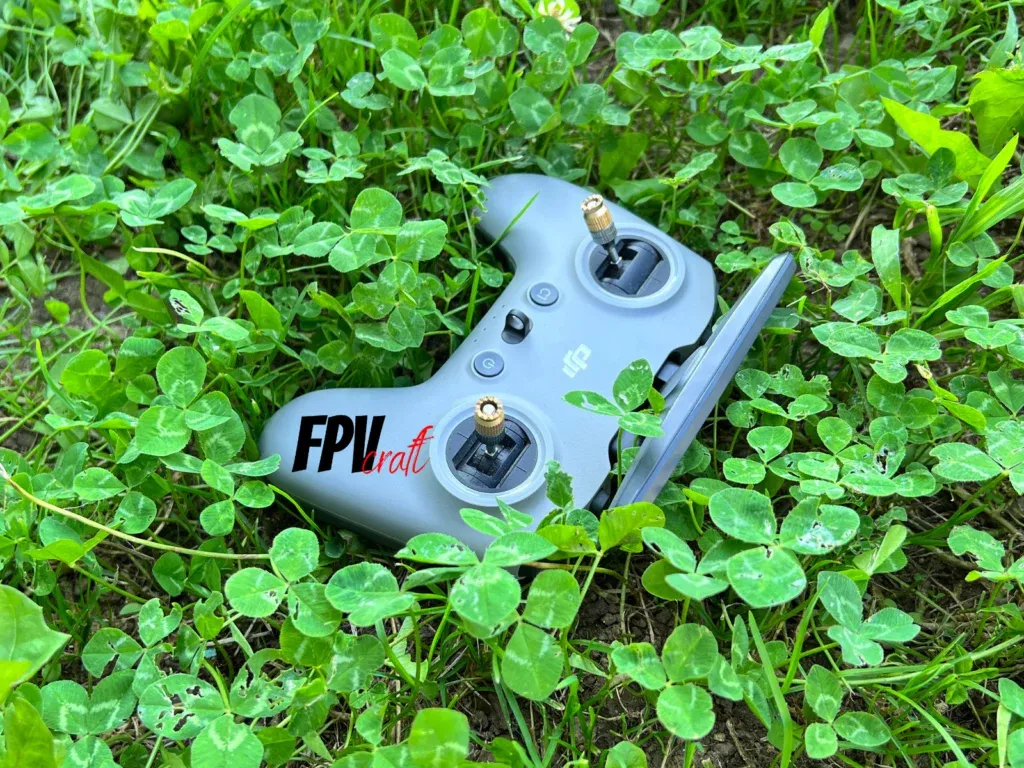
There are two ways you can update the firmware of DJI FPV Remote Controller 2 and one way to downgrade it.
To update (only) the firmware, you can do so if you have the DJI FPV or DJI Avata kit (controller, goggles, and drone). Install the DJI Fly App on your mobile phone and connect the phone to the goggles via a data cable.
Turn on all the devices and start the DJI Fly App. It will automatically check for updates for all parts, and if any are found, you can install it, including for the remote controller.
But this will work only if you have the entire kit at hand.
The easiest way to update it is to install the DJI Assistant 2 (DJI FPV version) on your computer and connect the DJI FPV Remote Controller 2 to the computer via a data cable. Enter the program, and once the controller is recognized, you can easily download and install any updates or downgrade if earlier versions are available.
If you are interested in that, I recommend you check the following articles for an in-depth guide with photos.
» READ MORE: Updating and Downgrading DJI FPV Firmware Explained
How to release throttle spring tension from DJI FPV Remote Controller 2
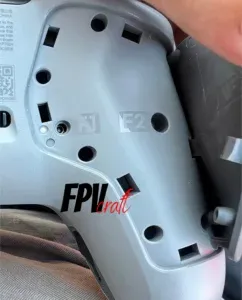
Before flying the DJI FPV or DJI Avata drone in special manual mode, you will have to do one crucial step: release the throttle spring.
It is a mechanical step that takes only two minutes but must be done carefully.
On the back of the controller (as in image 3), you have two access points covered by rubber pads. As you turn over the controller, there is the right side rubber for access to throttle gear.
You will have to use a small tool to place it underneath the rubber where the indicator is and pull it up.
You will see the marks printed F1 and F2 near two holes.
You should have been provided with an H1.5 hex key with your kit.
- When F1 is tightened, the control resistance increases
- When F1 is loosened, the control resistance is decreased
- When F2 is tightened, the recentering is disabled
- When F2 is loosened, the recentering is enabled.
So you have to disable the recentering and slightly increase control resistance for the throttle gear to not be loose. Adjust the F2 accordingly on the borderline of being loose but the throttle to be very smooth to play with.
My final thoughts about DJI FPV Remote Controller 2
I have used the DJI FPV Remote Controller 2 on many occasions, both with DJI FPV and DJI Avata. I also often use it to train in simulators nearly on a daily basis.
This remote controller became my favorite a long time ago.
I also own a FrSky Horus X10S Express and owned multiple radios, but I always love the small, delicate, and modern controllers. And the DJI FPV Remote Controller 2 is definitely one of them (from a guy who used to love playing on Xbox and Playstation)
The biggest downside, I can say, is the compatibility issues. So, unless you have a DJI FPV or DJI Avata or a compatible DJI VTX unit that works with your goggles as well, the only practical use you can have for this remote controller is the simulator.
For the price is not much. And I am actually surprised to see such a controller priced at $200.
But because I got used too often to smaller controllers, while I was writing this article, it came to my mind to purchase the TBS Tango 2 Pro, JumperRC, LiteRadio 3, or a RadioMaster. I will have to decide which one, but I may go with ELRS or Crossfire.
So, if you’re looking for a remote controller only for your DJI FPV or Avata, you don’t have much choice. DJI FPV Remote Controller 2 is definitely gonna work well; also, with some air units, it may work as mentioned, which makes it an excellent choice.
But if you’re looking for a separate radio transmitter channel from VTX, get something compatible with ELRS or Crossfire, in my opinion.
» READ MORE: DJI Avata vs. DJI FPV (In-Depth Comparison)

